

Now we have a bunch on penciled pages. Since I'm finishing them myself, the pages are still a bit sketchy.
I'm planning on also doing a materials and techniques post in the next couple weeks, after I finish this series. I'll expand on inking quite a bit then, but I'll touch on a few things I'm currently using...
INKING-
I start by taking a really good look at my pencils, which I now probably drew a few days ago, and seeing what bullshit I left myself for today. Sometimes I see the line I had intended to use when I'm drawing it, and now that I'm out of the moment I'm not sure what I had in mind. I make my fixes with the HB pencil.
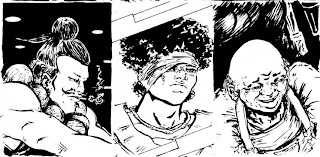
I ink in multiple passes over sets of three or four pages at once. I start with a very flexible dip pen, either a #108 crowquil or more recently, a Gillott 303. Often both. I find it easier to re-draw rather than kinda-trace with a pen than I do with a brush. I find strangely enough that if I start with a brush and ink sketchy pencils, I end up really messy inks. I usually have to make two passes over each page at this pen step to keep myself from smudging the the hell out of everything. Three passes if I had a martini for lunch.

Next I make the brush passes and build up my line variations, shade, spot blacks, etc. This is actually the bulk of the work, but it's in a two sentence paragraph; life is kinda like that sometimes.


I then do all the background detail work, which is where I'll use either the #102 crowquil or some of my preferred gel pens. Last, I'll make a effects passes like splatter, dry brush, ink wash, and any white ink that needs put down.
Unless its absolutely heinous or will be a mess to fix in Photoshop, I don't do any corrections at the inking stage. I actually tend to avoid corrections at all. Theres no surer way to let your inking take three times longer than it should by trying to tweak everything. Learn to let go. There's also nothing more frustrating than inking on a big blob of whatever white pigmentation you've just used, since it's probably going to look fucked up and need fixed in Photoshop anyway. I realize there are ways to do this, but I simply refuse to believe that any page going to Photoshop needs white out corrections.
I erase out as much pencil as I possibly can, except for the panel borders I'll need to see later, and get set up to scan.
SCANNING AND LAYOUT-
Next I scan all my pages in sections, usually however many panels will fit on the scanner bed, and save them. In some cases I need to use photomerge, but I now try to design pages that won't (an increased panel count helps). I have a very rigid file naming system so I know what chapter, page, and panels are contained in each file.
I then place all these panel files into InDesign. I set them up on a full size 10 x 15 template I made, and as I drop in the panels I drag out rules to match my original panel borders so the design of the page doesn't change. I won't reduce the files to standard comic book size until the art is completely finished.
The beauty of InDesign is you can move around and zoom in and out of each image inside its panel box. I try to take care of all my tangents here, and tweak any strange crops I had. The other beauty of having all those panels separate is they're saved as separate files. As separate files,you can expand an image in a direction in the file that on paper would have been on top of another panel. It's rare I need to do much of this, but it has come in handy at times. You can also move panels around, so if you want to switch the order of the panels you have options.
I scan and layout an entire chapter in about 6-8 hours, and then I'm ready to finish the images up. Next week we'll open up Photoshop and make this all look presentable.
No comments:
Post a Comment