
Thursday, December 13, 2012
Benthic Below the Surface is Closed
Benthic's online home has moved to BenthicOnline.com
With Benthic complete, printed, and available online, this is the final post in this blog. I want to thank everyone who has followed along and enjoyed! These posts are also featured in the blog archives of my personal site and tagged accordingly.
Thursday, February 16, 2012
Then It Was Done, and Gone to Print

It took a week shy of three years, but Benthic is finally done.
So how did the last ten months of the project go? Well, around the time I stopped the blog I was no longer able to financially work on the book full time. I took two not-so-hot jobs and worked 70 hours a week for about three months to dig myself out of that particular hole, and during that time progress ground to a halt. Then, a few months ago, I started freelance studio managing and was able to get the ball rolling again. In December I set myself a tight production schedule, in order to have this to the printer in time to reapply for the Xeric. It's been nights of working until 3-4 AM, 4-5 nights a week, ever since.
I stuck with it.
I'll have the printer proofs back in early-to-mid March, and then the full run of books should here in late May or early June. Then? RELEASE PARTY. I'm also going to release the comic online as a webcomic, but that's still too early to say much more.
I feel awesome. Tonight, I will sleep the sleep of the righteous.
Friday, April 1, 2011
Reflections

Real stuff getting posted to the internet on April Fools Day. How strange.
These past few weeks, while I've been posting process stuff, I've also been preparing a proposal for the Xeric Grant. It shipped out on the deadline yesterday, and it was an enormous undertaking. The proposal itself was a joint effort between myself and my oldest friend, designer extraordinaire Michelle Sukle, and I feel we put together a very good proposal. We won't know until middle of June, but I'm proud of what we accomplished regardless of the outcome.
I think anyone who is doing their own graphic novel should put together everything the Xeric asks for, regardless of whether or not they feel like they have a real shot at it. It forces you to answer the questions you may have been putting off or working around, and to mentally get a complete handle on the project. Writing the Statement of Purpose alone was enormously helpful when making my first pass on the script, and needing printing quotes forced me to finalize a page count and decide which ideas I could keep and which ones needed to be edited out. A lot got edited out honestly...this book needs to get done. Not every good idea I have needs to happen right now.
Where do we go now?
When I started this project in earnest six months ago and when I wanted everything done by March 15th- I don't think the book is running late as much as I didn't really understand how much work was involved. The time that has been involved in writing a full draft of the script, thumbnailing through the end of the book, preparing a final page count was something I hilariously enough thought would be easy. Of course, a Xeric proposal also includes a lot of the business end of the business and a ton of research.
I'm happy with the process I outlined, as far as the pencil-ink-grayscale workflow goes. The writing method will get seriously revamped for a future project. I haven't penciled and inked in the last two weeks, but mentally the project is much farther now. I'm exploring my options on lettering for this project, and I'll have to have that resolved before I know a new completion date. Progress is good though.
Friday, March 25, 2011
The Process, Part 4- Grayscale and the Great Beyond

GRAYSCALE-
Or How I Learned To Stop Worrying And Love Photoshop
My scanner kinda blows. It'll pick up detail until the cows come home, but God help it it can't scan anything thats actually black. I have a theory it's racist. (On an aside, it can't even remotely scan color right either. If I ever do a painted comic like I want to, my first step will be throwing this thing off the roof of my building)
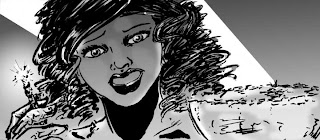
I scan everything in in grayscale, which the scanner can handle, and manually adjust everything with Curves. In my youth I used Levels, until everyone I knew yelled at me about it, and I can now admit they were right. This is also where I make my corrections. Sometimes it's not just a little whiteout either. I also can use this step to fix certain miscalculations, such as Issalai's mouth below, which now matches how I inked it in the rest of the chapter.


I want Benthic to be atmospheric, so I actually go out of my way to do different things at the grayscale stage. Different brushes, different methods of compiling, etc. If I don't keep this stage fresh I find it painfully boring. There are much better Photoshop tutorials floating around the internet if you're really into it...the truth is with Photoshop, I'm good but I'm not great. There are a few key things I usually do.
I usually use two or three different layers, all set to Multiply. Unless I'm intentionally going for a graphic effect, I usually set the opacity on my brushes pretty far down. Shape Dynamics being on is an absolute must, and Other Dynamics is usually on too. There are also sections where I kinda whore out gradients. I usually make one, copy the layer and then erase out whatever is in the foreground, and then make lots of copies of the background gradient and/or unifying gradient until I get it where I want.
Once the grayscayle image is good, I now switch it CMYK. Theres the correct way, and my way.
The correct way to do this is probably to keep source files of the grayscale, flatten the image at conversion and save a separate CMYK file; but InDesign is tied to the original file name and tha'ts where I figured out how and where I wanted everything cropped to begin with.. The only way I figure to get around this without manually relinking everything is making secondary source backups, storing them elsewhere, later renaming them, and making the original file names the flat versions. Fuck. That. I'm too busy as it is. Working in CMYK has its own host of issues I'm not dealing with either.
I just don't flatten the image, and re-tweak it once its CMYK. Yes it changes the images a bit (sometimes for the better, hooray!) but rarely is it earth shattering and almost never something I can't fix.
LETTERING AND BEYOND-
Which brings us to where I am now. These pages need text.
Remember back in Process 1, when we had less-bad dialogue? Now it all needs fixed before it can go on the page, and here's where I REALLY screwed myself. Whatever changes I make to the dialogue still has to fit the now-complete art and the facial expressions, gestures, and space allowances made. This severely limits my options. From here out I'm not penciling anything that doesn't have dialogue unless said dialogue is someone else's problem and this is how they want to do it. Ever.
Oh right! Lettering. On the existing versions of Chapter 1 and 2, I did the text bubbles in Illustrator, dropped in each bubble as a separate file, and set the text over it in InDesign again. Needlessly complicated with the added bonus that I'm rusty as hell in Illustrator. Right now, after much discussion with people I trust, the smart move with this process is to do all the lettering in InDesign itself with the pen tool and pathfinder. I've never done it before, so we'll see how it works out when the script revisions are finished and I start lettering.
The final book layout, before it goes to printing, is pretty easy to dial in since everything is already in InDesign anyway.
That's all I know and I'll I've got. I'll post some reflections, and some material and technique stuff next week.
Thursday, March 17, 2011
The Process, Part 3 - Sex, Drugs, India Ink (and InDesign?)

Now we have a bunch on penciled pages. Since I'm finishing them myself, the pages are still a bit sketchy.
I'm planning on also doing a materials and techniques post in the next couple weeks, after I finish this series. I'll expand on inking quite a bit then, but I'll touch on a few things I'm currently using...
INKING-
I start by taking a really good look at my pencils, which I now probably drew a few days ago, and seeing what bullshit I left myself for today. Sometimes I see the line I had intended to use when I'm drawing it, and now that I'm out of the moment I'm not sure what I had in mind. I make my fixes with the HB pencil.
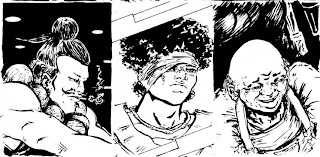
I ink in multiple passes over sets of three or four pages at once. I start with a very flexible dip pen, either a #108 crowquil or more recently, a Gillott 303. Often both. I find it easier to re-draw rather than kinda-trace with a pen than I do with a brush. I find strangely enough that if I start with a brush and ink sketchy pencils, I end up really messy inks. I usually have to make two passes over each page at this pen step to keep myself from smudging the the hell out of everything. Three passes if I had a martini for lunch.

Next I make the brush passes and build up my line variations, shade, spot blacks, etc. This is actually the bulk of the work, but it's in a two sentence paragraph; life is kinda like that sometimes.


I then do all the background detail work, which is where I'll use either the #102 crowquil or some of my preferred gel pens. Last, I'll make a effects passes like splatter, dry brush, ink wash, and any white ink that needs put down.
Unless its absolutely heinous or will be a mess to fix in Photoshop, I don't do any corrections at the inking stage. I actually tend to avoid corrections at all. Theres no surer way to let your inking take three times longer than it should by trying to tweak everything. Learn to let go. There's also nothing more frustrating than inking on a big blob of whatever white pigmentation you've just used, since it's probably going to look fucked up and need fixed in Photoshop anyway. I realize there are ways to do this, but I simply refuse to believe that any page going to Photoshop needs white out corrections.
I erase out as much pencil as I possibly can, except for the panel borders I'll need to see later, and get set up to scan.
SCANNING AND LAYOUT-
Next I scan all my pages in sections, usually however many panels will fit on the scanner bed, and save them. In some cases I need to use photomerge, but I now try to design pages that won't (an increased panel count helps). I have a very rigid file naming system so I know what chapter, page, and panels are contained in each file.
I then place all these panel files into InDesign. I set them up on a full size 10 x 15 template I made, and as I drop in the panels I drag out rules to match my original panel borders so the design of the page doesn't change. I won't reduce the files to standard comic book size until the art is completely finished.
The beauty of InDesign is you can move around and zoom in and out of each image inside its panel box. I try to take care of all my tangents here, and tweak any strange crops I had. The other beauty of having all those panels separate is they're saved as separate files. As separate files,you can expand an image in a direction in the file that on paper would have been on top of another panel. It's rare I need to do much of this, but it has come in handy at times. You can also move panels around, so if you want to switch the order of the panels you have options.
I scan and layout an entire chapter in about 6-8 hours, and then I'm ready to finish the images up. Next week we'll open up Photoshop and make this all look presentable.
Thursday, March 3, 2011
The Process, Part 2- Pencils Mean Never Having To Say You're Sorry

So our thumbnails are done and we're ready to, you know, draw the fucking thing.
I want to preface this by saying I spent a year of college, and numerous times during my furniture building career, trying to figure out some kind of shortcut to combine the penciling and thumbnailing process. Artographs. Scanning and printing. Drawing the panels on separate sheets of paper and putting them together in Photoshop. I wanted to beat the system. I was so damn smart wasn't I? No. No I most certainly wasn't. I have a secret for you. Here it is.
The best penciling process is to take a sheet, mark it out 10 x 15, and draw it right the first time. Thats it. The best process is not sucking. My process is working towards that.
THINKING -
Penciling is the only step I give myself an entire day to do, because it takes a different frame of mind. One of the things I discovered doing administrative work was that I'm not much of a multi-tasker. I work much better focused, I suspect I'm not the only one, and I do wish actually paying attention to what's being done and getting it finished sounded better in job interviews.
When drawing, if my focus is on the story and the best way to convey it, that extra thought will come through on the page. Comics is a lot more about drawing how you feel about whats going on than it is just showing whats happening.
I like to pencil when I'm feeling like I'm at the top of my game. I sleep in as late as I need to and get up when I feel rested. I make coffee and open up all the reference and "mood board" kind of stuff I have set aside to look over while I have breakfast. I stretch, work out, take my shower, and make sure I'm feeling good. Then I put on music and draw all day. I don't text/e-mail/Facebook/Twitter and with very few exceptions, I don't answer my phone or check voicemail. I break to eat, and sometimes I'll catch something on Hulu over dinner. These are good days.
DOING -
I have four magnetic boards on my wall. I can fit four pages on each one- but I usually do 11-12 pages at a time. I touched on the volume subject early in this project, and it's a good system. Also, I like having the board behind the computer open for any reference (usually pages from previous issues) as well as my To-Do list and random stuff.
When penciling a set of pages like this, I tend to bounce around once my panel borders are sketched in, usually depending on whether I feel like drawing backgrounds or people. Sometimes if I want a page in particular done and over with, I'll set a timer and finish the page before it goes off. I personally find a timer to be one of my most useful tools if I'm getting distracted or having trouble figuring out a panel.
My pencils on Benthic have been reasonably loose since I'm inking everything myself. If something gets to be messy and I don't feel confident inking it, I pull out the lines I want with a darker pencil. I draw in 2H, so even an HB can be pretty effective for seeing something I may miss at a later step.
The Process, Part 1- Ideas Before Pencils

There are always three ways to do something; The right way, the wrong way, and your way.
There's plenty of information out there on this subject that is technical and direct. Screw that. This is how an actual crazy artist, early in his career, tackles the monumental task of a graphic novel. This week is Part 1, so let's get started.
WRITING-
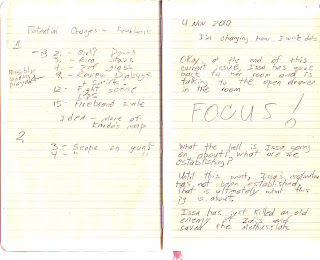
The writing process starts with two-part insanity. Part 1- Zoning Out. Making coffee, in the shower, goofing off online, and otherwise doing something mundane...and then losing complete track of what I'm doing as something plays out in my head. This is a technique I perfected years ago while tuning out everything my ex-girlfriend said.
Part 2- Stream of consciousness writing. Once I have the tertiary ideas for characters and scenes from zoning out all the time, I sit down with a notebook and basically write out a conversation to myself. I don't edit, I don't erase, and I write out what I like or don't like about what I just wrote. I doodle. Essentially I'm taking a runaway train of thought, and I start pushing behind it. Speaking of trains, I do most of this on the subway since I have time to kill. If anyone ever reads through that notebook, men with butterfly nets will be hauling me off within the hour.
Maybe I shouldn't have shown you that. Again.
I work the story out by breaking down the book into chapters, then I write/blather out the chapters scene by scene. Set design ideas, character motivations, dialogue rough drafts. Eventually I will read over what I just wrote for a chapter (which may or may not be an insane rant), figure out what needs to be in said scene for both narrative and pacing purposes; then assign each scene the number of pages I think they need to be. Once the page count starts, the rambling starts to take form.
THUMBNAILS-
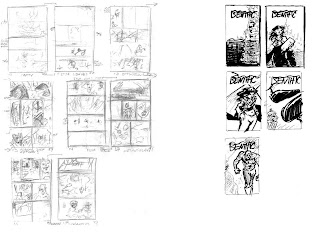
The scene-to-page-count outline for a chapter is what I base my thumbnails off of. I have two kinds of thumbnails- the kind that are only for me (sketchy penciled messes) and the kind I want someone else to see (much clearer, ballpoint pen and sharpie). While I'm doing thumbnails in my sketchbook, I also have the notebook out, as I skim the ideas to keep them fresh. I write a rough draft for any dialogue I didn't already write a rough draft for. This dialogue will base where I'm leaving room for text, and who needs to be standing where to talk in what order. Also! This dialogue will be absolutely terrible. Oops! We'll come back to that later, and on the computer. Right now I'm sick to death of writing and am ready to start drawing.
Things like camera progression now need to be fit on top of whatever pages I envisioned for this scene, reveals need placed after the page turns, stuff like that. I thumbnail pages as spreads so I know how two pages will look together, and what the viewer will see at a given time. Design choices are being made. Admittedly I didn't think about this part of the design near as much when I started, so the more recent chapters I don't readily have online yet are better examples. If only I had minored in Graphic Design...
The thumbnail step is really still a writing step though, because it is where I set the visual pacing. In my mind, the book and the chapter both need to breathe. When space opens up, panels get cinematic. When spaces are tight and stressful, the panel count increases and stresses out the page. Action tends to get vertical. These are just generalizations, it varies scene to scene.
There are no hard and fast rules for me other than the basic page rules I set for myself; in Benthic all my vertical panels break evenly in sets of two, three, or four. I don't get over 8 panels a page. No splash pages. Any panel stacks, which are limited, are always stacked on the right, and always when the vertical break is in the center of the page for that row. I never change scene mid-page. In the future I think I'll break up this visual language project by project, but I do think it helps to set yourself parameters at the start.
Once the chapter is more or less thumbnailed (80% is good enough to get things going) I'm ready to pencil! So...I wait. I wait a couple days and work on another step of something else. I have enough to do that these ideas can ferment. I come back to it, and like grease, all the suck as risen to the top to be skimmed off. NOW I can start.
That's it for Part 1! Next week we'll hang 11 or 12 sheets of Bristol on the wall and get penciling.
Subscribe to:
Posts (Atom)